Showing posts with label wisconsin patriot log home builders. Show all posts

Tuesday, July 6, 2010

Ward Log home ROOF PURLINS

over 30 foot long roof purlins in a WARD LOG HOME


Work in process by PATRIOT LOG HOME BUILDERS
This is a picture of the inside of the home gable cathedral round top windows , I think it is very impressive before the windows have been installed. I will have an inside picture to see with windows installed soon.


We are nearly finished with the Sandwich Illinois Ward log home. Here are a few of my favorite pictures of what we have done thus far. Note the structural roof purlins that as you can see are very decorative and really give this log home distinction. Now in this picture, we see the outside view of the same interior roof purlins but they extend out of the gable end and continue as part of the soffit. Wow doesn't this look impressive?

Beautiful design!!!!


here is a video of myself and Jeremy putting up gable roof purlins

WARD cedar log home

These are photos of a WARD cedar log custom LOG HOME that I have built in the spring/summer of 2010, I am not quite finished yet with it, I will be doing the staining and caulking after I get back from building in North Carolina.


Find more photos like this on Log Home Community

Monday, May 31, 2010

WARD CEDAR Log home

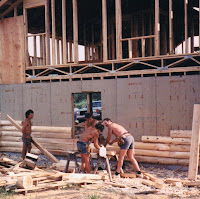
patriot log home builders working on a WARD log home QUALITY HOMES AT A GREAT PRICE

Tuesday, April 13, 2010

One of a series of Interview with LOG HOME BUILDING INFORAMTION

LOG HOME BUILDING INFORAMTION with Catherine Reinke interviews
MIKE HOMPERTZ of
Patriot Log Home Builders


Mike Hompertz, who has built for over 20 years discusses Hosteler as one of his favorite companies to build for and why he favors the "built up roof system". verses the rafter system.

PROMOTION; Offering FREE STAINING when you hire Patriot Log Home builders to build your log home this spring a $3000 plus value.

The benefits of choosing a log home specialist to build your log home over a stick framer. The log home builder can circumvent problems, has the proper tools...

Heavy equipment is often necessary.

Sunday, February 28, 2010

Update on log Home progress Log staircase

The home owners Steve and Addy Miller in their Log Home by Hochstetler


These are the home owners Steve and Addie Miller on top of their second floor. I certainly have enjoyed working for this couple who have been gracious and appreciative. I recently completed the spindles and hand rails of the interior of the staircase. These are white cedar, which come pre drilled, to install them I had to drill threw the post to hold the top and bottom railings. The treads and stringers are 3 1/2 x 12 Doug fir beams. All the angle pieces on the stairs are not pre drilled which involved much more calculating on my part to keep the spindles plum and spaced evenly. Remember you can not go over 4 inches on the spacing or it will not pass code.


When it was finished, it was very rewarding for me and I can say that I am proud of this work, looks like the homeowners like it too!


ShareThis

Sunday, August 30, 2009

Thinking of putting in your own fireplace? I did it.

HOW TO INSTALL YOUR OWN WOOD BURNING FIRE PLACE

In our ranch home, I installed two insert fireplaces that burn wood. We really wanted a Wood burning fireplace. I Had never done one before , so my wife checked on costs and we were astounded at the quotes we received. I had already framed them.

All that had to be done was to cut the hole in the roof, run the pipe and attach. We were quoted $4000.00 for both. We called all fireplace stores in the Wausau area, one would not even give us a quote. This did not include stone or any finish facade.

So, we took a trip to Menard's. We purchased all the materials for two fireplaces for less than $1500.00. ( including fans for both, and screens) It was really fairly simple.

Measure the width and height of the insert, frame it with 2 x 4 and use plywood to in close.

I had a bit of fun with my design. In the bedroom I placed the fireplace in the corner and put it up on a 2 foot hearth and ran window blocks underneath with eclectic and lighting for night light effects (we install red colored bulbs when the fireplace is not in use or during the Summer months) Then I ceramic tiled the base. I used extra beams that I had from building log homes, and ran them up the sides and used one beam as the mantle from wall to wall. It is a very impressive look.

This creative placement did not cost any thing. I did another atypical design in the living room as well. I must say that I pride myself on using material that I have on hand to keep costs down.

Now as far as the piping goes, I used a double wall pipe, ran it threw the hole in the roof, re shingled the roof and made sure that it did not leak. I used tar , caulk and metal flashing . They have not leaked, knock on wood.

We love our fireplaces. I just wanted to share with anyone who is thinking about putting in their own , that they can do it. Do not be intimated.


ShareThis